Prepare an email marketing campaign
Prepare the campaign as one complete mailing: who should receive it, what they should see and when it should be sent. The mailing list, reusable design template and individual campaign are separate items.
For reusable designs, use Create and manage email templates. For images, layout, widgets and formatting, use Design an email template. A library design and an individual campaign are separate records.
Open the campaign dashboard
- In Builder, open Email marketing and choose Go to your eMailSense dashboard.
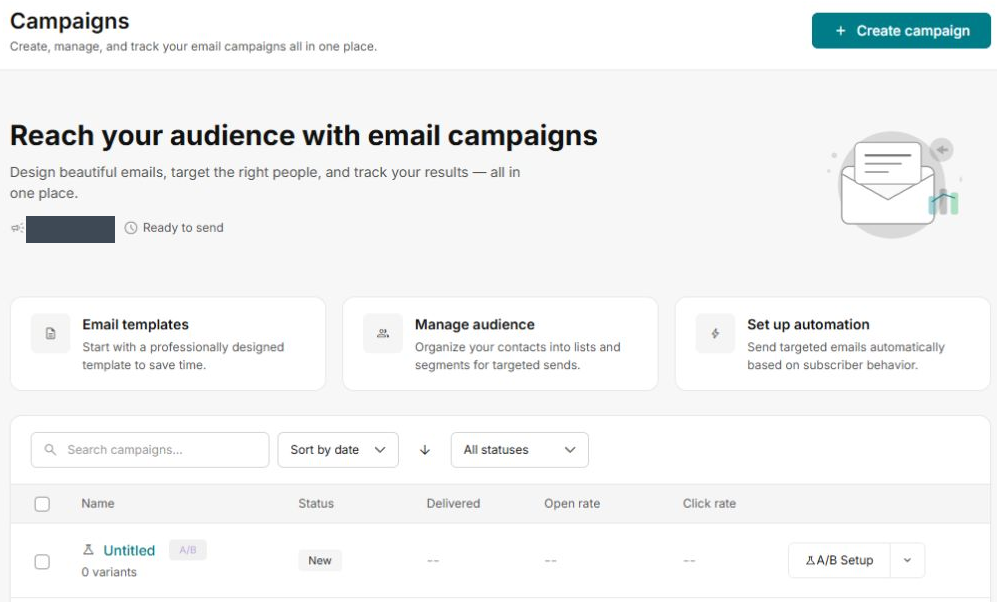
- In eMailSense, choose Email to see campaigns. Use the name search, status filter and date/name sort to find an existing mailing.
- Read its status before continuing. Open Edit on the intended New campaign when preparing an unfinished mailing; a sent campaign has a separate View action.
- To start a different mailing, choose Create campaign and review the type before using its Create action.
Choose a campaign type
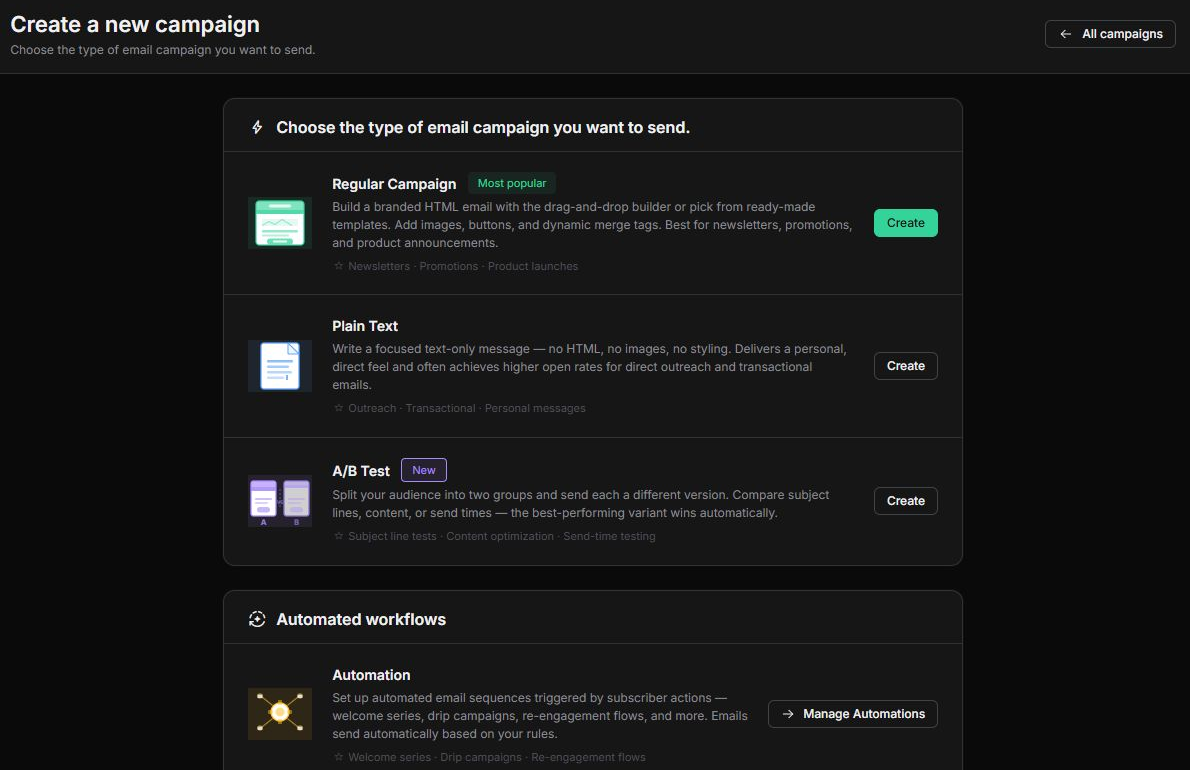
Regular Campaign is the HTML option for a designed newsletter or promotion. Plain Text is for a text-only message. The chooser also offers A/B Test and links to Manage Automations; these have their own setup and release decisions. Do not treat an automation as a one-off newsletter.
Prepare an A/B campaign
An A/B campaign has its own setup, variants and winner rules. Decide the question before creating it. For example, compare two subject lines while keeping the intended message and audience criteria consistent, so you know which difference you are investigating.
Create makes a draft immediately. Choosing Create on the A/B Test card opens a new Untitled campaign. Returning to All campaigns leaves that draft in the list; it is not an undo or deletion action. Find an existing A/B draft and use A/B Setup when you intend to continue it rather than create another.
Review Campaign basics
- Check the campaign identity and use a recognisable Campaign name.
- Review Audience list against the intended subscribers.
- Review Test audience size and the displayed test versus winner-rollout percentages. At a displayed test size of 100%, the summary shows a 0% remaining rollout; do not assume every test reserves a second audience.
- Review Assignment strategy. The form distinguishes Exact split from approximate Hash split; choose deliberately for the intended audience rather than treating these as different message variants.
- Use Save & Continue only for intended settings. Reopen and check the actual stored audience and split before proceeding.
Review variants and winner rules separately
The Test variants tab offers Add variant and requires at least two variants. An empty test shows No variants yet and disables Continue to Winner Rules. Review the intended subject and design for each actual variant; do not treat creating the parent draft as creating the versions to compare.
- In Winner selection, review the offered Highest open rate, Highest click rate and Manual selection choices.
- Review Wait before deciding where shown, including its hours value. The explanation describes a later winner rollout to the remaining audience; read it alongside the actual selected mode and split.
- Review the launch checklist: audience list, configured variant count and whether variant splits total 100%.
- Stop if the audience, versions or intended decision rule is incomplete or unclear. Complete all steps first is disabled on an unconfigured test; opening the winner tab does not make it ready to launch.
If an unexpected Untitled A/B draft appears
Open All campaigns and identify the A/B row by its setup and status. A New row with zero variants is an unfinished draft, not evidence of a sent comparison. Inspect it before creating another. Keep any deletion separate from abandoning the setup, and check the actual campaign state before using release controls.
Create and check the draft variants
- Save the intended Campaign basics first. If The mail list id field is required appears, review Audience list; do not assume the campaign name or other changes were saved.
- In Test variants, choose Add variant. Enter a useful Variant name and its Email subject, then submit Add variant once.
- Check the resulting variant card before adding another. It shows the subject and design status; No template selected or Template needed is unfinished content.
- Add the other intended version and check each card's name, subject and displayed split. Review the control label and total split rather than assuming that adding another variant preserves earlier percentages.
- Open the intended variant's settings. Review From name, From email and Reply-to separately from its subject and design. A created variant with a subject is not a checked sender setup.
- Use Choose template for that variant's design. The chooser offers gallery designs and Paste custom HTML. Keep the intended content separate for each version.
- After saving content, reopen the intended variant's Preview template and inspect its actual wording and links. Check both versions; one ready design does not complete the other.
- Return to All campaigns and check the intended A/B row, audience, variant count and status before leaving the draft.
Find the sender settings for each A/B variant
- Open the intended A/B draft’s Test variants page and check the campaign name.
- Open the intended variant card. The side panel is headed Variant settings and identifies the variant; check whether it is the Control.
- Under Email settings, review From name, From email and Reply-to separately from Variant name and Email subject.
- Open From email to inspect Verified senders. Review the addresses or domain guidance offered for your account. A domain-wide entry describes eligible addresses; enter the actual authorised address you intend to use, not a masked example or asterisks.
- Use a From name customers will recognise. Confirm who receives replies at the intended Reply-to address and check its spelling.
- For an intended update, review the whole variant panel before Save settings. Reopen the same variant and check the stored sender fields, then review every other variant separately.
- Return to Review & Launch and inspect the sender summary again before any separately intended release. Saving sender settings is not the same action as launching a campaign.
If no suitable verified sender or domain is offered, ask the person responsible for the sending setup to check it. Do not substitute an unrelated address to clear a warning. If the final summary still says No sender info, keep the campaign and variant names with the displayed values for support; do not launch or create replacement variants to bypass the problem.
Using custom HTML for a variant
Paste custom HTML opens a content editor with a separate Save HTML action. Read the confirmation carefully: switching to Custom HTML locks that design to HTML mode and removes the route back to the visual builder described in the warning. Keep the original design separately and proceed only when you intend that change.
After saving, return to the variant list and inspect the saved preview. A Ready badge identifies a design state; it does not establish that sender details, recipient handling or delivery have been validated.
If a variant save returns an error
- Keep the exact message, campaign name and variant name.
- Return to the existing draft and inspect that variant's design status and preview before repeating the save.
- If the intended content appears in preview despite an error, keep both facts for support. Do not assume the error means nothing was saved or that the preview proves every related setting is correct.
- Stop before release if saving, reopening or editing remains uncertain. Do not create duplicate variants to work around an ambiguous response.
Check readiness beyond the launch checklist
The checklist summarises audience selection, variant count and whether splits total 100%. Inspect every variant's actual subject, sender details, template status and preview as well. A green checklist is not a substitute for those checks; a version can still need its design.
For a subject-line comparison, keep the intended body and sender consistent and review each actual subject. The design, audience and result interpretation should match the question you are testing. Before any release, check the intended winner rule, timing, remaining rollout, schedule and complete campaign summary. Keep draft preparation separate from sending or scheduling.
Review the final A/B launch screen
The winner page's Proceed to schedule link opens Review & Launch. Review that screen separately before any release.
- Check the audience list and displayed recipient count against the people intended for this test.
- Check the variant names and percentages, total split, each selected email template and each subject line.
- Review Sender info (from name & email) for every variant. If a version says No sender info, return to its settings and arrange the correct validated sender setup before release.
- Check the displayed Win condition and return to Winner Rules if it does not match the intended comparison.
- Resolve every warning. If Launch A/B Test is disabled, do not repeatedly select it or create another campaign to bypass the missing setup.
The final screen can show additional problems after the earlier winner-page checklist has passed. Review both the summary and each variant's actual content. A recipient count, a Ready design or a green split check alone does not establish that the campaign is ready to send.
Opening this screen is a review step. Launching is a separate action that can send to the selected audience; use it only when the intended campaign release has been approved and all preparation checks are complete.
Save and check A/B winner rules
- Open Winner Rules on the intended draft and review Win condition.
- Choose the intended rule: Highest open rate, Highest click rate or Manual selection. Review the displayed explanation and the question your comparison is meant to answer.
- For an automatic rule, review Wait before deciding and its hours value alongside the test audience and any remaining rollout.
- Choose Save & Continue for the intended update. Check the Win condition and wait shown on Review & Launch.
- Return to Winner Rules if you need to verify the stored choice. Check the actual selected rule and hours before continuing; opening a tab alone is not a saved update.
Review each variant’s sender separately. Save settings updates its sender fields; reopen the variant and check its name, From address and Reply-to. If the editor requires a field, leaving it blank is not a way to undo an earlier save or disable sending. Use the intended valid sender details or ask support about removing a sender configuration. Closing the panel does not undo values already saved.
A readiness check can confirm that sender information is entered without establishing that a Reply-to inbox exists or is monitored. Confirm the actual sending identity and reply handling with the person responsible for your email setup.
Review the A/B send time
- Complete the audience, variants, designs, subjects, senders and winner rule, then review the final campaign summary.
- When the release choices are available, read which option is selected. Send now describes starting immediately; Schedule for later reveals Schedule date & time.
- For an intended future release, enter the required date and time and read the displayed time-zone statement. Check it against the time your audience should receive the campaign; do not assume the time zone matches the device you are using.
- Review the selected send option and date/time again after returning from another setup page. Do not assume an earlier unsubmitted schedule choice has been retained.
- Read the final Launch A/B Test action as a release action, separate from saving variant settings or winner rules. Use it only for the intended approved release after checking the complete summary and timing.
If you are only preparing the draft, leave the release action unused. After an intended release, inspect the actual campaign status, timing and delivery results before deciding what happened. See campaign results; a ready checklist or a completed form is not proof of delivery or a completed winner rollout.
Review the five-step campaign wizard
- Recipients: check each Mailing list and its optional Segment. Add another list adds another audience row; review every row and the Default choice. Use Remove this list only for an audience you intend to leave out. Check actual subscribers rather than relying on the campaign name.
- Setup: enter the internal Campaign name, recipient-facing Email subject, From name, From email and Reply-to email. Use the intended verified sender and a reply address your team monitors.
- Review Track opens, Track clicks, Enable DKIM signing, Skip failed messages and optional Enable UTM tracking as separate choices. The Setup form also has a Webhooks Manage entry; leave an established integration unchanged unless you intend to configure it.
- Use Save & Continue only when the changes on that step are intended. Following a step link is separate from saving its form. If a later step returns you to Setup, review missing required information before trying again.
- Template: review System templates or My templates and the All, Base and Extended filters. Check the intended design before choosing it. Your Custom HTML is a separate route for a prepared HTML design.
- Schedule and Confirm are later steps. Complete the design and inspect the actual send time, time zone, recipients and final committing action before releasing the mailing.
Prepare the audience and sender
- Identify the intended list and inspect actual membership. Check group scope, guest-order contacts and exclusions before treating a list as the intended audience.
- Confirm the account/subscription and the intended sending-domain status.
- Prepare an internal campaign name, recipient-facing subject, From name/address and the intended reply handling.
- Check the current provider’s campaign types and settings before choosing an HTML design or plain-text mailing.
Check a campaign’s row actions
- In Email, find the intended campaign and read its name, audience and status.
- Open the small action arrow on that row. Keep the row identity in view before choosing an action.
- Use View report for reporting. Replicate, Send test email and Delete are different operations; do not use them to open a report.
- A sent campaign can also offer Resend and Archive. Review its existing results and intended recipients before deciding to send again. Do not assume every status has the same menu.
- If no action is intended, close the menu without choosing one.
A test email is still a send. Review the actual recipients and confirmation before submitting one. Likewise, inspect the intended result and its recipients before releasing any replicated campaign; do not assume replication has the same effect as resending.
Select campaigns deliberately
- Use the checkbox on the intended row. Check the campaign name and status again after selecting it.
- The Actions button displays a selection count. Check that count before opening its menu.
- The bulk menu offers Resume, Pause and Delete. Review every selected campaign and the actual confirmation before using a bulk action. The menu being available does not establish that each selected status supports that action.
- Clear the row checkboxes when the selection is no longer intended. Check that the selection count or Actions button has cleared.
If an action affects sending, check the campaign’s actual state afterwards. Do not assume that closing the menu, deselecting a row, archiving or deleting a campaign recalls messages that have already been sent. For an unexpected send state, retain the campaign name, status and exact message for support before repeating an action.
Browse campaign template choices
- Open the intended draft campaign and select its Template step.
- Use System templates to browse the supplied designs. The gallery offers All, Base and Extended views.
- Use Next and Previous where available and check the page indicator. Moving through gallery pages lets you review more options without choosing a design.
- Use My templates to find your saved reusable designs. Check the design name and campaign before using its Choose action.
The Template gallery label can appear disabled while you are already in that view; use the gallery’s available browsing controls. Choosing a template is a separate step from browsing. Afterwards, inspect the actual campaign content, images, links and personalisation before saving or continuing. Do not assume choosing a reusable design sends the campaign or updates every campaign that uses it.
Review campaign webhooks with your integration administrator
Webhooks are an optional integration feature. They are not needed simply to write an email. In the campaign’s Setup step, the webhook area has a Manage link. Check the intended campaign before opening it.
The webhook list offers Add webhook. Its form has Webhook type choices for Open tracking, Click tracking and Unsubscribe, an Endpoint URL, and an Active checkbox. The form explains that the receiving service gets a POST request for the event and that inactive webhooks do not deliver events.
Have the person responsible for the receiving service supply and verify the intended address, event and handling before adding or activating an integration. Check the actual result in that service after an authorised test; a visible configuration alone does not prove delivery or successful processing. Keep passwords and private tokens out of screenshots or support messages.
To inspect without creating an integration, leave the fields unchanged and do not use the form’s Add webhook button. If Cancel does not return you to the campaign, navigate back to the intended campaign and check its webhook list before trying again.
Prepare the design and content
Use a suitable reusable template if one is available, or prepare a fresh layout in the current editor. Have the logo, appropriately sized images, headings, message, destination links and business/contact details ready. Review the layout after changing or removing sections. Review each element’s wording, images, fonts and colours in the campaign designer.
Write a short preheader to support the subject rather than repeat it. For example, a subject of “New season bags have arrived” could use “Explore the new colours and sizes” as its preview text. Review any proposed attachment against the current service’s supported formats and limits before relying on it.
Example: announcing a new collection
Use one clear introduction, an image that represents the collection, a short explanation and a link to the relevant shop page. Check that the linked products are available and that the offer wording matches the actual dates, eligibility and prices. Send the example to the intended subscriber audience rather than assuming every synced customer belongs in the campaign.
Review before release
- Preview the layout on relevant device sizes; check images, links, subject and preheader.
- Review the current settings for tracking, authentication and failed-recipient handling rather than carrying over old recommended switches automatically.
- Where a controlled test message is intended, review its recipients and the current test-send action before using it. A test message is still a send.
- Check the live recipient count, sender, content and intended send time/time zone.
- Identify whether the final action saves a draft, schedules a future send or starts sending immediately. Read its confirmation before proceeding.
- After an intended release, check the actual campaign state and available delivery results. A completed wizard alone does not prove delivery.
If you need to stop or change it
Inspect the actual campaign state before editing or submitting again. Ask support about the current pause/cancel controls and whether sending has started; do not assume closing the browser cancels a scheduled or running mailing.
