
Review email campaign results
Read the dashboard’s time windows
- On the dashboard, read the period printed beside each headline card. Do not assume all sections use the same period.
- Under Sending Activity, choose 7 Days, 30 Days or 90 Days for that chart. Allow it to finish loading before comparing the result.
- If it says No sending activity in this window, compare the selected period with when your campaign was sent. An empty recent window does not establish that an older mailing was never sent.
- Read the dashboard’s update time and the chart’s Data computed at time. Check campaign-specific reports when investigating an individual mailing.
The dashboard has a Refresh dashboard data control and Sending Activity has a separate Refresh. Check the section and timestamp you intend to update. Allow the result to load and compare its displayed update time rather than repeatedly requesting refresh. A data-refresh control is separate from sending a campaign.
If a chart window and a headline card appear to disagree, compare their printed periods first. In particular, changing the Sending Activity window does not mean a card labelled Last 7 days now represents 30 or 90 days.
Review the intended mailing after release to check its status, recorded activity and any delivery problems. Keep campaign reporting separate from editing a mailing or changing its subscriber list.
Find a campaign before opening its report
- Open Email to see the campaign list.
- Use the list’s search field to enter a distinctive part of the campaign name, then wait for the rows and displayed result count to finish updating.
- Check the status filter. Return it to All statuses when you are unsure which state applies; a status-filter choice and the wording on a campaign row need to be read in context.
- Compare the name, audience, actual row status and A/B label or variant count before opening anything.
- For a sent regular mailing, use its View action. For an A/B test, select the campaign name for its report; A/B Setup is the configuration entry.
- Clear the search when looking for another campaign and check the displayed count again. A reduced result list is not evidence that a missing campaign was deleted.
For example, searching for “Summer offer” can help distinguish a named campaign from an unrelated draft. If you then look for a different mailing, clear that name search and check the status filter first. A blank delivery/open/click figure on a New row is separate from a zero result on a sent campaign.
Open the intended campaign report
- Open your eMailSense dashboard from Builder and choose Email, or use View Reports on the dashboard to open the campaign list.
- Find the campaign by name and check its status and intended audience. Use its View action to open a completed mailing.
- On Overview, confirm the campaign name, sent date, recipient information and Last updated time.
- Review the Recipients, Delivered, Opened and Clicked figures alongside the Rate summary. Check bounced, unsubscribed and spam-report entries as well.
- Under Campaign details, compare the subject, From, Reply to, recipient list and tracking settings with what you intended to send.
Read an A/B test report
- In Email, find the intended campaign and check its A/B label, variant count and status.
- Select the campaign name to open A/B Report. The separate A/B Setup action opens configuration.
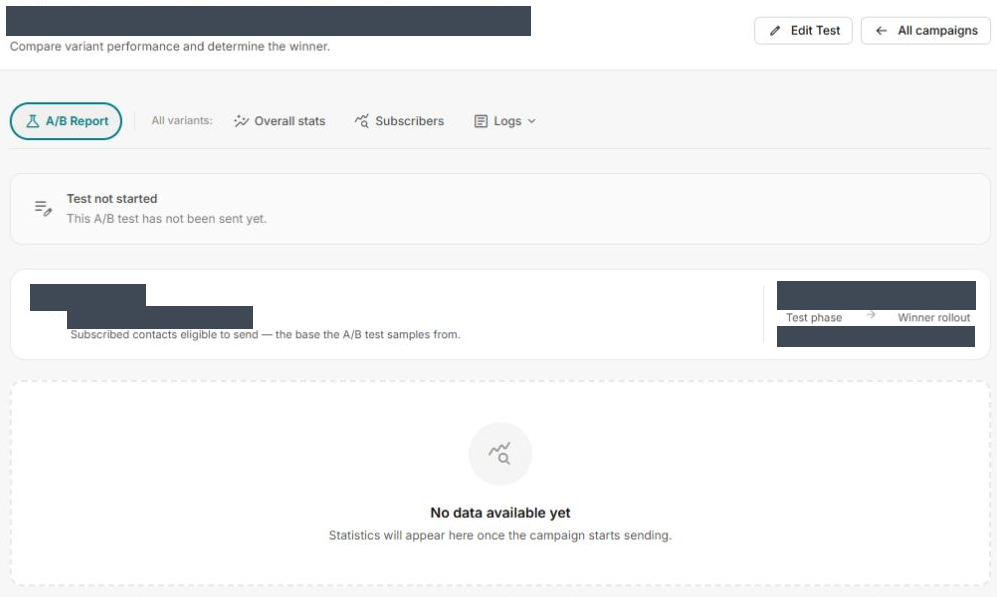
- Read the test-state message first. Test not started says the test has not been sent; a report page can exist before performance results do.
- Compare the selected list’s total contacts with its deliverable count. The report describes deliverable contacts as subscribed contacts eligible to send, which is the base sampled by the test. Do not assume the list’s total is the available test audience.
- Read both percentages and contact counts for Test phase and Winner rollout. A 100% test phase can show a 0% remaining rollout; compare the actual numbers rather than assuming every test sends a winner to another group.
- Check Winner criteria, Assignment strategy and Recipients alongside the state message. These labels do not establish that a winner has been selected or any delivery completed.
- Use Overall stats and Subscribers under All variants for the combined campaign views. Keep that scope separate from a comparison of individual variants.
- Use Logs to choose Delivery, Bounce, Open, Click, Unsubscribe or Webhook deliveries. Review the intended campaign and actual loaded result; a Loading message is not an empty-log result.
If the A/B report has no data
Check the campaign’s actual status and the report’s state message. An unsent test can show No data available yet and its Delivery log can say No delivery logs found. Keep setup, audience eligibility and recorded performance separate. Do not launch, schedule or resend merely to clear an empty report.
For an intended release, return to the audience, variants, sender and winner-rule preparation steps. After release, compare the actual state and recorded activity before interpreting the result; a configured winner rule or a ready design is not evidence of completed delivery or winner rollout.
Choose the evidence for the question
| Question | Where to look |
|---|---|
| What did the campaign record for sending? | Open Sending logs → Delivery log and inspect the recipient, Status and Date. |
| Did an address bounce? | Open Sending logs → Bounce log. Compare Recipient, Bounce type, Reason and Date. |
| What opening or clicking activity was recorded? | Review Open log or Click log from Sending logs or the Overview links. |
| Which links need attention? | Review the Links tab and available click-log information. |
| Were there unsubscribes or complaints? | Review the Unsubscribe log and Feedback log. Keep those records separate from a decision to send again. |
| What content was associated with the mailing? | Use Email review or the campaign’s Preview entry, checking the intended campaign first. |
Use the search and date sort controls within the delivery or bounce log to find the intended record. Compare the date and recipient carefully, especially when investigating several campaigns.
Find a recipient in the campaign report
- Open the intended campaign and choose its Subscribers tab beside Overview. Keep this separate from the main workspace’s Subscribers page, which manages a list.
- Read the campaign name and the delivery-status breakdown. In the recipient table, compare the address, Last open, Last click and Status.
- Use the search field for the recipient you are investigating. Review the open, click and status filters separately: All opens offers Opened and Not opened; All clicks offers Clicked and Not clicked; All status offers Sent, Error, Pending and Skipped.
- For an opening query, choose Opened and wait for the table to finish loading. Check the resulting rows and displayed count. Restore All opens when you need the wider view again.
- Review the other active filters before interpreting an empty or reduced result. Use Sort to choose Most recent activities first or Most recently sent first according to the question.
- The Columns menu offers First name, Last name and Created at. Review the intended choices before using its Apply action; these display choices are separate from subscriber editing.
For example, use Opened to locate the recipients with recorded opening activity for this campaign. Return to All opens before investigating someone else, and check click/status filters too. A filtered table is not a change to mailing-list membership.
Compare link and location reports
- Open the campaign’s Links tab to inspect its link-activity view.
- If it says No links tracked yet, read the explanation and compare it with the campaign’s Click log and tracking settings. This empty state does not itself show what links were included in the email.
- Open Map and choose Open map or Click map for the activity you intend to review.
- On Click map, compare Locations, Countries and Total clicks with the click-location area. A message saying No click location data yet concerns that activity view; an Opens by country section can still contain information.
- For recipient-level click investigation, use Sending logs → Click log. Check the search, date sort and sort-direction controls, then wait for the actual log to load before drawing a conclusion.
If summaries and individual records disagree
Keep the campaign identity, last-updated time, selected filters and exact row statuses together. Compare the recipient table with the relevant delivery, bounce, open or click log. A headline or a positive delivery message does not establish that a particular inbox received or displayed the message. If the same campaign still shows conflicting states, ask support to reconcile them before changing subscribers or sending again.
Review activity over time
Performance over time offers Last 24 hours, Last 3 days, Last 7 days and Last month. Choose a window appropriate to when the campaign was sent; a recent window can be unhelpful for an older mailing. Compare the displayed period with the campaign’s sent date and update time.
Example: a headline looks successful but an address bounced
- Check the campaign identity and Last updated time.
- Open its Delivery log and Bounce log, then compare the intended recipient and dates.
- Keep the exact displayed status, bounce type and reason for support. A Sent label alone does not establish that the recipient read the message.
- If the headline and detailed records disagree, ask support to reconcile them before changing the list or sending another copy.
If a section says Not available yet
Check the campaign’s status, sent date, selected time window and Last updated time. The report has Refresh campaign data and some sections offer an update action. These are data-refresh controls, separate from a new campaign send. Allow the result to load and compare the timestamp instead of repeatedly pressing update. If the section remains unavailable, retain the campaign name and exact message for support.
Investigate before changing recipients or resending
Keep a record of the intended audience and the problem you are investigating. Do not automatically remove a subscriber, reverse an unsubscribe or resend the whole campaign because a summary looks unexpected. Confirm the specific cause and intended action first.
Delivery-log rows also offer Preview HTML and Download .eml. Treat recipient-specific message copies as private records. Check the intended row before opening or downloading one, and share only the information support needs.
Prepare a campaign · Investigate list synchronisation · Review the sending domain.
