New Till Point Set-up
Set-up Your Hardware
After connecting everything i.e. printer, cash drawer etc and enabling an internet connection
Install Web Browser:
- If you don’t have it already download & Install Google Chrome– go to https://www.google.co.uk/chrome/ (and set it as default browser)
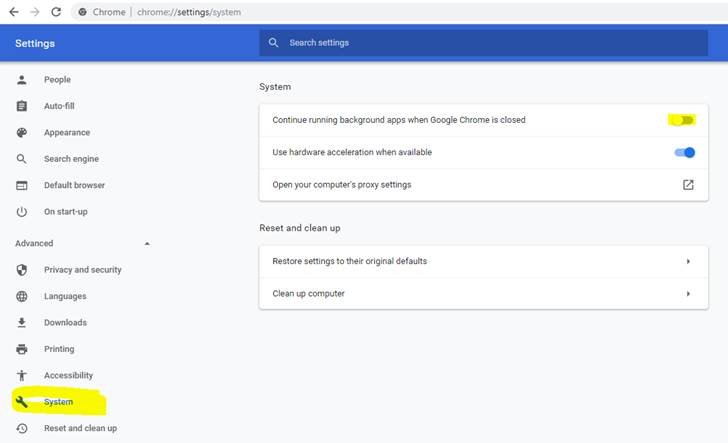
Disable Background processes
- Open Chrome and in Chrome Settings chrome://settings/system Advanced > System turn off the ‘continue to run background apps’ see:
Print a receipt
- Using the newly installed Chrome browser log into your ShopTill-e account and print a receipt (you can do this without placing a fresh order you can go into any existing order in the orders list screen then click the printable button and select receipt). Using the printer dialogue select the receipt paper size that is first in the list, untick the headers/footers checkbox, set to custom margins , zoom into the receipt and adjust the margins as needed. Once you’ve done this click print and check all is good, if not repeat this process to get the receipt printing correctly.
Enable silent/Background Printing
- Once it has been confirmed that the receipt is printing correctly, create the icon to directly launch the till and enable the silent/background printing – first copy/duplicate the Chrome Browser shortcut on the desktop, ‘right’ button mouse click this copied shortcut and select properties…
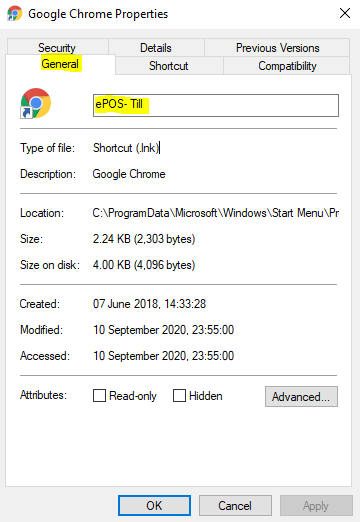
Rename the shortcut to e.g. ‘ePOS – Till’ this is done in the general tab change the name, click apply
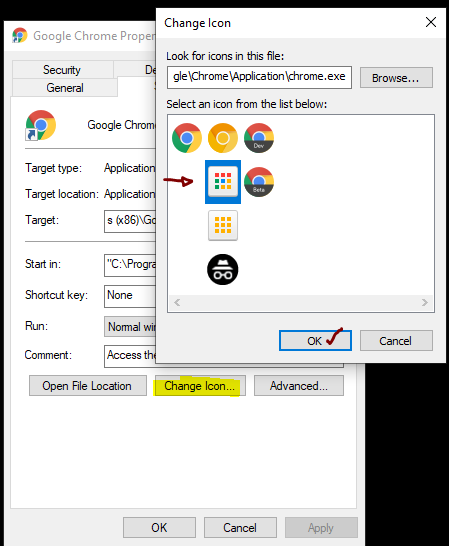
Change the icon so that it is easy to recognise by clicking the button at the bottom of the shortcut tab, click apply.
e.g. 
At the end of the ‘target’ field which is at the top of the shortcut tab put a space after the “chrome.exe” part and paste in --kiosk-printing " https://YOUR-SHOP-NAME.shoptill-e.com/builder/pos.php" click apply & OK (also see https://www.shoptill-e.com/support/48).
After completing the above steps you should end up with a shortcut something like this on the desktop:

Name the new Till Point
- Give the till point a name click the ‘Unregistered’ link at the top of the till screen enter a relevant name for this till also set an optional float (also see https://www.shoptill-e.com/support/61) -you can edit later in https://YOUR-SHOP-NAME.shoptill-e.com/builder/settings_pos.php
Set-up Complete
- That should be it, so lastly check that the till screen loads all OK from the new shortcut/icon, which should take you straight to the till screen.
It may be wise to place a couple of test orders via the till to double-check everything is working correctly i.e. that receipts print look ‘nice’, without the printer dialogue, the cash drawer opens etc
Future adjustments to printer dialogue
Should you need to adjust any printing, the setting refers back to point 4 above and remove the --kiosk-printing part click apply & OK to remove the silent printing function when launching from the shortcut. The printer dialogue should then be shown again when you print to make any adjustments then simply put the removed --kiosk-printing back in place after restoring the silent printing function.
Screenshots relating to the shortcut set-up: